Wednesday, 8 August 2018

Apple Reaches 1 Trillion Dollar Value:See Why and How?

Apple Inc. on Thursday became the first public company to cross 1 trillion figure in the market capitalization. Apple shares ( NASDAQ: AAPL) closed on a record closing of 207.89 %. It reached as high as 208$. This epic feat achieved by Apple is by beating other rival companies like Amazon, Google Microsoft, and Facebook. If Apple […]

The following post Apple Reaches 1 Trillion Dollar Value:See Why and How? was originally published on: https://www.ikeema.com

Wednesday, 11 July 2018

How to Change Language on iPhone/iPad? – With Screenshots

After reading this article, you will be able to change language on iPhone/iPad in seconds. Let us agree, We all like to operate our devices in our native languages. iPhones by default come with a language of their manufacturing region. For example, if your iPhone /iPad is manufactured in China, it will come with the Chinese language as default. […]

How to Change Language on iPhone/iPad? – With Screenshots was originally published to: iPhone Blog

Saturday, 7 July 2018

How To Clear Cache On MAC Like A Pro?

Whenever I feel my Mac is not running fast, I clean my Mac. To clean is to delete cache on Mac and clear cookies on Mac. For the same reason, you hear it now and then “how to clear cache on Mac” but what is a cache exactly? And why to clean it? Cache memory is temporary data […]

How To Clear Cache On MAC Like A Pro? was first published to: https://www.ikeema.com

Tuesday, 3 July 2018

How To Fix iCloud Verification Failed Error?

Do you see an error like ‘iCloud verification failed‘ or ‘There was an error connecting to the apple id server’on your iPhone/ iPad?. These errors are common and tuff to get off. All you need is a good step by step guide to removing iCloud verification error. When people say Apple iPhone, iCloud is the […]

How To Fix iCloud Verification Failed Error? is courtesy of: https://ikeema.com

Wednesday, 16 May 2018

How to Use iMessage on PC?

Using iMessage on PC have been a top searched query in among our reader’s. So today we are presenting a detailed step by step guide to using iMessage on PC/Computer /Laptop. iMessage is a massively cherished chat option among iOS users all over the world and is equally in demand by non-ios devices users as well. […]

How to Use iMessage on PC? is available on: https://ikeema.com/

Monday, 14 May 2018

How to take a Screenshot on Mac Using Shortcuts & Apps?

Hi, Mac users. Today we are discussing  How to take a Screenshot on Mac. One of the most searched question on Google is How do you take a screenshot on Mac?

The amount of important Web information we consume in our daily life is increasing day by day. Thus, There is a Growing need to preserve all these details.

Details Ranging from Banking, Finance to Personal Health. Or you may want to send a screenshot of an error on your Mac to Apple support to get the issue fixed. And not to forget useful information, you read on a Web page (like this one) you want to save.

Surely, Too much to remember and note down.

Human attention span has never been this short in our History and our memory? Even shorter. Therefore, there must be a way to record this information.

Just imagine a situation where you hand noted a bank Account number for Internet Banking Transaction. Mix up a Single digit can flush your hard earned money in a wrong account.

Hence, Screenshots are important. More important to Know How to take them.

screenshots

This post is a gift to everyone who wants to know How to take a Screenshot on Mac?

So Fasten your 'MacBelts' we are hitting the deep waters right in 3,2,1,.....

Also Read: How To Screenshot On iPhone X?


How to take a Screenshot on Mac using Keyboard Shortcuts?

Old school methods never go out of trend. The best Mac screenshot shortcut is to use your keyboard.

You can take Screenshots on Mac using dedicated keyboard shortcuts.

This utility comes with two options. Either you can choose to take Screenshots of the whole Screen or a selected area.

How to Screenshot your Entire Screen using Keyboard Shortcut?

You need to Press SHIFT along with COMMAND key and 3 at the same time.

(COMMAND KEY- The key with the Apple and/or clover-leaf (⌘) symbol (usually next to the space bar. )

So,SHIFT + COMMAND +3 = ENTIRE SCREEN SCREENSHOT. (YEAH !)

take mac entire screen screenshot

Where these Screenshot stored in Mac?

By Default, the location of all your Screenshots is your Desktop.

You can also Screenshot a selected portion of your Screen, as per needed.


How to Screenshot Selected Screen portion using Keyboard shortcuts?

To Screenshot a particular Part of the Screen, follow these steps.

1-Press SHIFT  key along with COMMAND  key and 4 at the same time.

mac selected screen screenshot shortcut

2-So,SHIFT + COMMAND +4 = A Crosshare (crop box ) appears.

Screen Capture Margins

3-NOw, Use this Box to drag and select the part of Screen you want to Screenshot.

4- To choose to move the box to the area you want to start from.

5-To move the selection Hold the SHIFT or  SPACEBAR along with trackpad button.

6-Finally, Release your mouse or trackpad button when you've selected the area you want.

7-Mac will save the Screenshot File on the desktop.

8-Use Esc(Escape) key to Cancel the selection.

Did you memorize the shortcuts?

NO, then Read further About using Grab And Preview features of Mac to Screenshot Mac screen.


How to take a Screenshot on Mac using 'GRAB'?

GRAB is a Screen capturing tool inbuilt in your Mac. It helps to Capture active screens and save them accordingly.

Grab works similarly to Snipper tool in Windows PC.

How to Access 'GRAB' on your Mac?

  • Open  Applications on your Mac.
  • Next click on Utilities
  • Then choose GRAB from listed options.

open Grab in mac

Steps to take a Screenshot on Mac using Grab.

  • Open GRAB
  • Then click on Capture, 4th from the top-most menu.

You get three options.

  • Option 1- lets to take a Screenshot of a selected area.
  • Option 2 -lets you take a Screenshot of the window.
  • Option 3-Let's you take a Screenshot of the entire Screen.

how to take a screenshot on mac using grab

All this on one click.

Wait...

But what about option 4?

Grab also allows a user to take timed Screenshots. You can pre-time your Screenshots using Grab.

screenshot on mac using grab

This is how to take a screenshot on Mac using GRAB


How to do a MacBook Screenshot using Mac Preview?

Preview is the default App on your Mac that lets you open and views files. From photos to pdf files, you can open any file in Preview. It also allows you to edit these files.

In this case, we are looking for the ability of Preview App to capture Screenshots. In fact, You can  Enjoy Hassle-free one click Screenshots with Preview.

Follow these steps to take a Screenshot using Preview.

  • Open Preview from the finder
  • Next, Click on File.
  • Then, drop down to second last option "Take Screenshots".
  • There are 3 options available.

how to take a screenshot on mac using grab

Option 1- allows a user to take Screenshot of a selected area.

Other Option 2- allows a user to take a Screenshot of the current window.

Option 3- allows a user to take Screenshot of the entire Screen.

To save your  Screenshot file in Preview.

  1. Click on File from the Top menu
  2. Then click on Save

screenshot on mac using preview

After trying everything, still not able to take Screenshots on your Mac,
then you are qualified to read 'Why Screenshots not working on Mac'?


Why are Screenshots not working on Mac?

Some specific Apps and Web pages do not allow to take a Screenshot of their content. Thus anyone can go mary go round on Screenshot failure.

Popular sites like NETFLIX  restricts Screenshots or Screen recording. Similarly there are are other commercial and educational sites don’t allow to take a Screenshot.

So Stop beating the bull for milk...and just try to  NETFLIX and Chill !.

You May Like: Fix Mac Running Slow Issue In Minutes

Low on your iPhone Storage? Then have a look at this article >> Delete documents and data on iPhone to clear used space


That's all folks!

To Conclude, Today we learned about different methods of taking a screenshot mac. Why taking screenshots on mac fail even after trying everything.

Tune in to ikeema.com for iPhoneiPad, or Mac related queries.

Connect with us on Facebook.

How to take a Screenshot on Mac Using Shortcuts & Apps? was first published to: www.ikeema.com

Friday, 4 May 2018

Mac Running Slow? Why and How to FIX it quickly?(New)

Is your Mac running slow?
A slow Mac can drop down your work productivity by at least 26 %.

Mac is widely known for its fantastic performance among professions as well personal computer users worldwide.

Even a premium class machine like Mac can get slow down by regular usage.
A slow Mac results from insufficient storage, an outdated software or a combination of more than one factor.

Hence, their speed and performance start to decline and end up with your Mac running slow.

So if you ever wondered Why is my MAC so slow? or your MacBook Pro running slow then this post is for you.

In this post, we will tell you
How can you speed up Mac easily and fix your slow Mac like a PRO!

Without more blah blah lets learn how to make Macbook Pro faster!


HOW TO SPEED UP MY MAC LIKE A 'PRO'?

1# Mac running slow because of insufficient storage?

Hard drive running out of storage space can consequently make your MacBook lag while you work. Low availability of storage space disrupts Mac performance and you experience a slow Mac.

However, managing your storage and trashing unnecessary files can consequently result in increased Mac speed and improved performance.

SOLUTION:
If Mac running slow due to inadequate storage, then you need to check the storage status of your device.

How to check storage status on Mac?

  1. From the Apple menu, choose About This Mac.
    about this mac
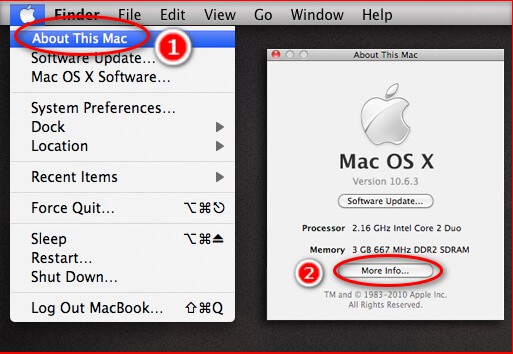
  2. Click More Info option 
  3. Then select  Storage, 3rd on the top lane of options.
    storage in mac
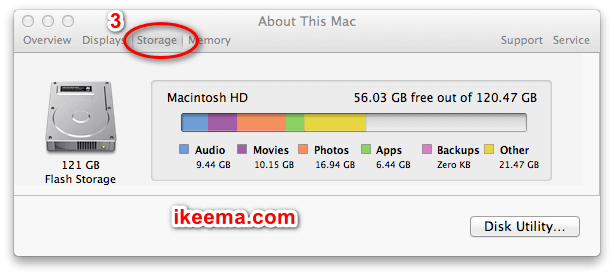
  4. Storage status appears.

Ideally, 10% of free storage is required by MAC OS to function smoothly.

In order to speed up Mac, we need to clean up Mac hard drive by following methods.

How to clean up Mac Hard drive?

 1-Delete files you no longer need.  

2-Move your files to iCloud storage.

3-Move your files to external disk drive.

4-Look for Duplicate Files, delete them.

Following these methods, you can clean up Mac in no time. 


2# Delete Cache, Cookies and Junk files.

Cache files are temporary files that store information related to used web pages, app-generated caches etc.

Crashing of any programme or in case of error can make cache file go corrupt.
Corrupt cache files can make individual programs or Mac OS perform indifferently at times as a result.

Cookies and junk files create the same impact on your Mac performance. These are the unwanted leftovers of web pages, programs, and used files.

SOLUTION:

  1. Delete cache from your web browsers a manually.
  2. Also, Delete temporary files from apps.
  3. Delete all Cookies from individual web browsers.

how to clean system junk in mac

This will remove a heap unwanted items and thus give your Mac Os to have some 'AIR' to breathe and perform better.

ALSO READ: Fix An iPhone Stuck In Recovery Mode!


 3# Check unwanted background running Apps.

Too many apps running in background consume processor power due to which we experience Mac running slower.

There are apps which we don't need to use but somehow, they are presently running in the background.
Such Apps consume system power and in conclusion, leave less power in the processor for other functions.

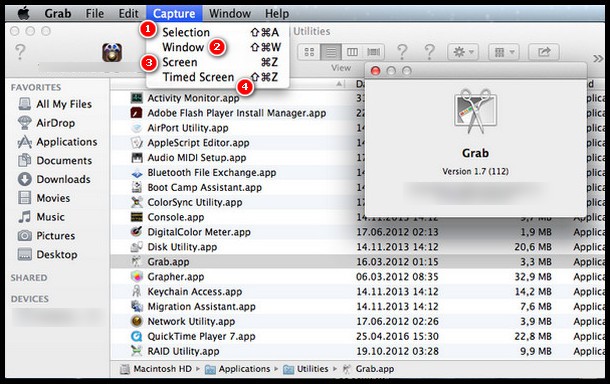
SOLUTION: Diagnose background running Apps using Activity Monitor. Stop apps from running in background.

What is an Activity Monitor?

Activity Monitor is kind of a diagnosing tool that shows us what are the apps running on our system at present?
How much power and battery they are consuming.?

How to access Activity Monitor?

From here you can choose to Stop an app from operating.

  •   Click on the App in the list
  •   Click “x” icon located at the top-left corner of the window

activity monitor

Ending the unrequired apps will take away the pressure from your processor.
Consequently, you can experience a better Mac Speed.


 4# Light down Startup items Preference. 

What are Startup Items?

Startup item is a bundle of programs that get loaded on their own along with system os, every time you start your Mac.

Sometimes unnecessary programs get Preference on your startup program list.

Such items burden your Mac processor and therefore you experience a slow start. In addition to these items hanging down on the riff of your startup items list keep creating an additional load of on your processor throughout the use.

SOLUTION: You can fix this by managing your startup items list.

How to manage Startup items on Mac?

In order to check your startup items list follow these steps.

  1. Go to System Preferences.
    system preference in mac
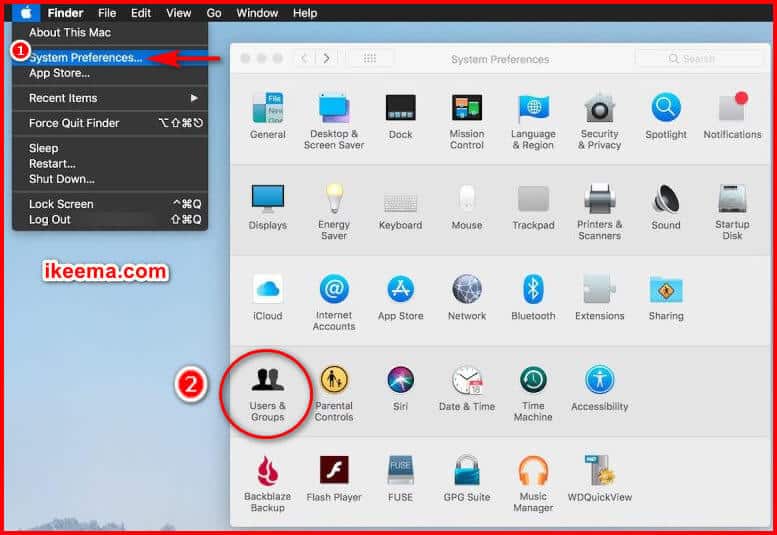
  2. Click on Users & Groups.
  3. Select  Login Items.
  4. Next, Select a program you don’t immediately need when your Mac starts up
  5. Then click the “–” button below.

mac running slow:start up items list

Narrowing down your Mac startup items can heavily improve overall Mac speed and performance.


5# Update your Outdated Mac Os.

Outdated Mac OS can cause a problem in the functioning of your device. Therefore it is of utmost necessity to keep your OS and all your Apps updated.

Apple issues timely Updates in order to meet the present requirements for your system to run swiftly.

At the same time, one needs to make sure they opted for Auto-Update for OS and all other  Apps.

How to check SOFTWARE UPDATE ON MAC?

  1. Click on the  Apple menu and select "App Store."
    from App, Store window Click the "Updates" tab.
  2. Click "Update" next to any available update to Install it.
  3. It will download and Install automatically
    update os software for mac running slow
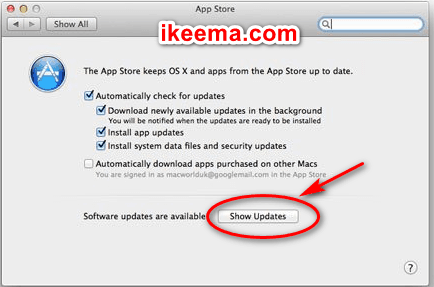
  4. You can see App Updates and system updates in the list of available updates
    (only if there are any new updates available)

Finally, when you are done with this step, as a consequence you will experience a better speed in Mac.

Suggested: iPhone touch screen not working? Here’s Why and How to Fix it?


Final Thoughts

In conclusion, Today we learned about the possible reasons that can consequently make your Mac slow. Ranging from a low storage space to Outdated OS.

We also discussed How can a user fix a Mac Running Slow by themselves, by listing all the proven solutions in simple steps.

At iKeema, we are a team of dedicated experts with profound knowledge devoted to solving all your queries related to Mac/MacBook Pro/MacBook Air, and other all other iOS devices.

Feel free for raising any query related to iPhone/iPad/iPod in the comment section below.

Do share this article in your circle in order to help Mac users.

Connect with us on Facebook for upcoming exciting new updates.

The blog post Mac Running Slow? Why and How to FIX it quickly?(New) is available on: www.ikeema.com